| (3 révisions intermédiaires par le même utilisateur non affichées) | |||
| Ligne 10 : | Ligne 10 : | ||
|Introduction=Un autre projet avec un ESP8266 qui joue avec la météo : [[Petit_parapluie_connecté]] | |Introduction=Un autre projet avec un ESP8266 qui joue avec la météo : [[Petit_parapluie_connecté]] | ||
}} | }} | ||
| − | {{Materials}} | + | {{Materials |
| + | |ItemList={{ItemList | ||
| + | |Item=D1 mini | ||
| + | }}{{ItemList}} | ||
| + | }} | ||
{{Tuto Step | {{Tuto Step | ||
|Step_Title=Installation de l'ESP8266 | |Step_Title=Installation de l'ESP8266 | ||
| Ligne 38 : | Ligne 42 : | ||
Pour Windows et Mac, il est nécéssaire d'installer des pilotes. /!\ la connexion d'un Wemos D1 mini sur mac cause un "Kernel Panic" et fait planter le mac. Il faut installer des pilotes dédiés qu'on trouve ici : | Pour Windows et Mac, il est nécéssaire d'installer des pilotes. /!\ la connexion d'un Wemos D1 mini sur mac cause un "Kernel Panic" et fait planter le mac. Il faut installer des pilotes dédiés qu'on trouve ici : | ||
| − | * [https://docs.wemos.cc/en/latest/ch340_driver.html Téléchargez les pilotes CH340 USB to UART]. | + | *[https://docs.wemos.cc/en/latest/ch340_driver.html Téléchargez les pilotes CH340 USB to UART]. |
| Ligne 73 : | Ligne 77 : | ||
{{Tuto Step | {{Tuto Step | ||
|Step_Title=Branchement de l'écran à l'ESP8266 | |Step_Title=Branchement de l'écran à l'ESP8266 | ||
| + | |Step_Content=La référence de l'écran : '''''2.4″ ILI9341 Color Display TFT with Touch Interface (320×200 Pixels)''''' | ||
| + | |||
| + | <br /> | ||
| + | }} | ||
| + | {{Tuto Step | ||
| + | |Step_Title=Récupérer les données météo du site OpenWeatherMap | ||
| + | |Step_Content=Openweather est un service en ligne permettant d'avoir des prévisions météo accessibles seulement si vous avez une clé d'accès à l'API (une clé d'API) | ||
| + | |||
| + | Tout d'abord, rendez-vous sur le site https://openweathermap.org/ pour vous créer un compte. | ||
| + | |||
| + | Cliquez ensuite sur l'onglet API keys, donnez un nom à votre clé et généré là. | ||
| + | |||
| + | Copiez cette clé et collez là dans le code de votre projet. (Voir étape 5 ci-dessous) | ||
| + | |Step_Picture_00=Afficheur_m_t_o_Capture_d_e_cran_2022-03-03_a_17.42.15.png | ||
| + | |Step_Picture_01=Afficheur_m_t_o_Capture_d_e_cran_2022-03-03_a_17.55.27.png | ||
| + | }} | ||
| + | {{Tuto Step | ||
| + | |Step_Title=Modification dans le code pour chez-vous | ||
| + | |Step_Content=Lorsque vous ouvrez le programme "NOMDUPROGRAMME" que vous venez de téléchargez, plusieurs onglets doivent apparaitre. | ||
| + | |||
| + | L'un d'eux porte le nom "'''''settings.h'''''" | ||
| + | |||
| + | Parcourir ce fichier et modifier : | ||
| + | |||
| + | *'''''ligne 28 :''''' Le nom du réseau wifi local (Ce qu'on appelle le SSID) | ||
| + | *'''''ligne 29 :''''' Le mot de passe du réseau wifi local. | ||
| + | *'''''ligne 38 :''''' Votre clé API généré à l'étape 4. | ||
| + | *<nowiki/>'''''ligne 45 :''''' Trouvez les identifiants de la ville souhaitée en tapant celle-ci dans le système de recherche proposé '''''Search city''''' puis entrer. Retrouvez le numéro identifiant dans la barre d'adresse web https://openweathermap.org/city/<nowiki/>XXXXXXXXX | ||
| + | *'''''ligne 46 :''''' Renseigner le lieu en toute lettre. | ||
| + | *Téléverser le programme et voilà, c'est fait | ||
| + | |||
| + | <br /><syntaxhighlight lang="c++" line="1" start="27"> | ||
| + | // Setup | ||
| + | String WIFI_SSID = "LENOMDURESEAU"; | ||
| + | String WIFI_PASS = "CLÉDURÉSEAU"; | ||
| + | #define WIFI_HOSTNAME "ThingPulse-weather-station-color" | ||
| + | |||
| + | const int UPDATE_INTERVAL_SECS = 10 * 60; // Update every 10 minutes | ||
| + | const int SLEEP_INTERVAL_SECS = 0; // Going to sleep after idle times, set 0 for insomnia | ||
| + | |||
| + | |||
| + | // OpenWeatherMap Settings | ||
| + | // Sign up here to get an API key: https://docs.thingpulse.com/how-tos/openweathermap-key/ | ||
| + | String OPEN_WEATHER_MAP_API_KEY = "CLEAPI"; | ||
| + | /* | ||
| + | Go to https://openweathermap.org/find?q= and search for a location. Go through the | ||
| + | result set and select the entry closest to the actual location you want to display | ||
| + | data for. It'll be a URL like https://openweathermap.org/city/2657896. The number | ||
| + | at the end is what you assign to the constant below. | ||
| + | */ | ||
| + | String OPEN_WEATHER_MAP_LOCATION_ID = "3031582"; | ||
| + | String DISPLAYED_LOCATION_NAME = "Bordeaux"; | ||
| + | </syntaxhighlight><br /> | ||
| + | |Step_Picture_00=Afficheur_m_t_o_Capture_d_e_cran_2022-03-03_a_18.10.09.png | ||
}} | }} | ||
{{Notes}} | {{Notes}} | ||
Version actuelle datée du 3 mars 2022 à 19:28
Création d'un afficheur des données météorologiques de votre localité provenant de l'API OpenWeather.

Difficulté
Facile
Durée
1 heure(s)
Disciplines scientifiques
Arduino, Informatique, Science de la vie
Introduction
Un autre projet avec un ESP8266 qui joue avec la météo : Petit_parapluie_connecté
- Matériel et outils
D1 mini 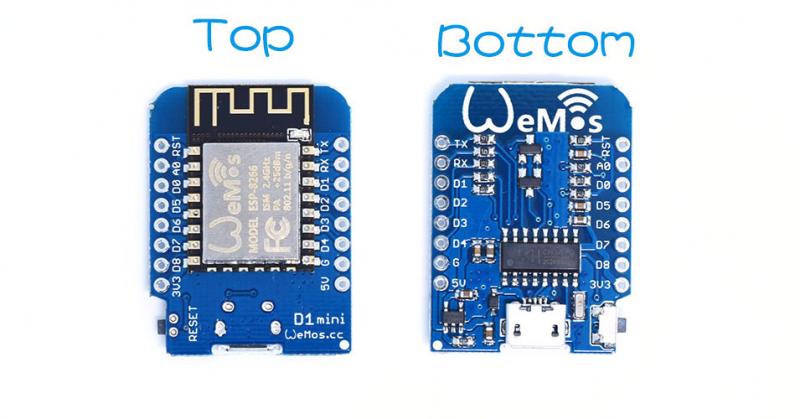

C'est un cousin de l'Arduino, avec du wifi !
Étape 1 - Installation de l'ESP8266
Bien entendu, il faut avoir installé Arduino
Installer l'environnement Arduino sur votre système
Importer de nouvelles cartes dans l'interface Arduino
1-Ajout d'un catalogue de cartes dans l'interface de développement Arduino
Importer de nouvelles cartes dans l'interface Arduino
Dans le champ "URL de gestionnaire de cartes supplémentaires"copiez-collez l'URL suivante : http://arduino.esp8266.com/stable/package_esp8266com_index.json
2-Ajout de la carte
-> Outils -> Type de carte -> Gestionnaire de carte -> Rechercher et installer ESP8266 by ESP8266 community
3-Installer les pilotes
Pour Windows et Mac, il est nécéssaire d'installer des pilotes. /!\ la connexion d'un Wemos D1 mini sur mac cause un "Kernel Panic" et fait planter le mac. Il faut installer des pilotes dédiés qu'on trouve ici :
Plus de détails ici : Utiliser_le_D1_mini_avec_Arduino


Étape 2 - Import bibliothèque
Pour notre projet, nous aurons besoin d'ajouter les bibliothèques suivantes via l'interface Arduino :
-> Mini Grafx (by Daniel Eichborn)
-> ESP8266 (by Weather Station)
-> Json Streaming Parser
-> ThingPulse XPT2046 Touch
Importer des bibliothèques dans l'interface Arduino
Vous pouvez installer que les bibliothèques ci-dessus.


Étape 3 - Branchement de l'écran à l'ESP8266
La référence de l'écran : 2.4″ ILI9341 Color Display TFT with Touch Interface (320×200 Pixels)
Étape 4 - Récupérer les données météo du site OpenWeatherMap
Openweather est un service en ligne permettant d'avoir des prévisions météo accessibles seulement si vous avez une clé d'accès à l'API (une clé d'API)
Tout d'abord, rendez-vous sur le site https://openweathermap.org/ pour vous créer un compte.
Cliquez ensuite sur l'onglet API keys, donnez un nom à votre clé et généré là.
Copiez cette clé et collez là dans le code de votre projet. (Voir étape 5 ci-dessous)


Étape 5 - Modification dans le code pour chez-vous
Lorsque vous ouvrez le programme "NOMDUPROGRAMME" que vous venez de téléchargez, plusieurs onglets doivent apparaitre.
L'un d'eux porte le nom "settings.h"
Parcourir ce fichier et modifier :
- ligne 28 : Le nom du réseau wifi local (Ce qu'on appelle le SSID)
- ligne 29 : Le mot de passe du réseau wifi local.
- ligne 38 : Votre clé API généré à l'étape 4.
- ligne 45 : Trouvez les identifiants de la ville souhaitée en tapant celle-ci dans le système de recherche proposé Search city puis entrer. Retrouvez le numéro identifiant dans la barre d'adresse web https://openweathermap.org/city/XXXXXXXXX
- ligne 46 : Renseigner le lieu en toute lettre.
- Téléverser le programme et voilà, c'est fait
// Setup
String WIFI_SSID = "LENOMDURESEAU";
String WIFI_PASS = "CLÉDURÉSEAU";
#define WIFI_HOSTNAME "ThingPulse-weather-station-color"

const int UPDATE_INTERVAL_SECS = 10 * 60; // Update every 10 minutes
const int SLEEP_INTERVAL_SECS = 0;        // Going to sleep after idle times, set 0 for insomnia


// OpenWeatherMap Settings
// Sign up here to get an API key: https://docs.thingpulse.com/how-tos/openweathermap-key/
String OPEN_WEATHER_MAP_API_KEY = "CLEAPI";
/*
Go to https://openweathermap.org/find?q= and search for a location. Go through the
result set and select the entry closest to the actual location you want to display
data for. It'll be a URL like https://openweathermap.org/city/2657896. The number
at the end is what you assign to the constant below.
 */
String OPEN_WEATHER_MAP_LOCATION_ID = "3031582";
String DISPLAYED_LOCATION_NAME = "Bordeaux";
Dernière modification 3/03/2022 par user:Bloup.
Draft